Minimum Code Blogger Template
I try to understand how the blogger template works. This is the
minimum code that should be put in blogger template editor. We can
access blogger template editor by clicking Edit HTML in blogger
template.
Blogger give us notification for every error exist in the blogger template. By saving the template, we can see the error notification. For example after deleting all the code when i tried to save the template there is notification "Error parsing XML, Line 1, Column 1 : Premature end of file."
To understand the minimum blogger template code, i tried to write HTML code one by one and see the error notification given by blogger.
XML is a mark-up language, eXtended Mark-Up Language. The syntax is almost the same with HTML. There are some differences between XML and HTML. We will learn about it latter.
When we tried to save the template there will be another error.
Type the code below:
Type the code below:
When we tried to save the code above, there will be a notification that the skin must be located inside the <head> tag. That's why we need to put <head> tag before skin.
add the yellow code below:
Add the yellow code below:
Put the id for section that has been created.
Add the yellow code below:
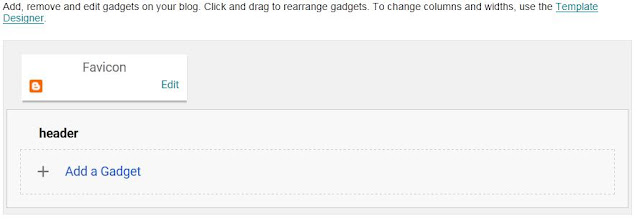
Picture above tell us the blogger element. We can see
a header section that we created previously. Beside that, there is
Favicon Box that will contain logo for the blog.
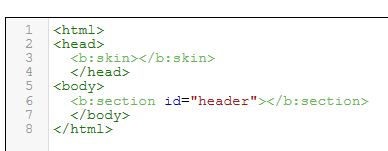
So finally the minimum code for blogger template consist of 9 line as showed above.
After we save the template, blogger will add the document declaration and HTML element. Below is the complete code for blogger template that can be saved.
<?xml version="1.0" encoding="UTF-8" ?>
<html xmlns='http://www.w3.org/1999/xhtml' xmlns:b='http://www.google.com/2005/gml/b' xmlns:data='http://www.google.com/2005/gml/data' xmlns:expr='http://www.google.com/2005/gml/expr'>
<head>
<b:skin></b:skin>
</head>
<body>
<b:section id="header"></b:section>
</body>
</html>
That all the learning for this time. Latter on we will learn how to create an header on blogger template.
 |
| Minimum Code Require for Blogger Template |
Blogger give us notification for every error exist in the blogger template. By saving the template, we can see the error notification. For example after deleting all the code when i tried to save the template there is notification "Error parsing XML, Line 1, Column 1 : Premature end of file."
To understand the minimum blogger template code, i tried to write HTML code one by one and see the error notification given by blogger.
 |
| Blogger Template Editor |
1. We can not save an empty template
 |
| Error appeared when we tired to save empty template |
XML is a mark-up language, eXtended Mark-Up Language. The syntax is almost the same with HTML. There are some differences between XML and HTML. We will learn about it latter.
When we tried to save the template there will be another error.
Type the code below:
<html>
</html>
</html>
2. There should be one and only one skin in the template
| Blogger need one and only one skin |
<html>
<b:skin> </b:skin>
</html>
<b:skin> </b:skin>
</html>
Skin are used to style the blog. Blogger need it one and only one.
3. The template must include a" <head>"tag
 |
| The Skin Should Be Put Inside <head> Tag |
When we tried to save the code above, there will be a notification that the skin must be located inside the <head> tag. That's why we need to put <head> tag before skin.
add the yellow code below:
<html>
<head>
<b:skin></b:skin>
</head>
</html>
<head>
<b:skin></b:skin>
</head>
</html>
4. The template must include a" <body>"tag
 |
| Blogger template need <body> tag just like HTML document |
When we tried to save the code above, there will be a notification
that we must include a <body> tag. This is where the content of the blog located.
add the yellow code below:
<html>
<head>
<b:skin></b:skin>
</head>
<body>
</body>
</html>
<head>
<b:skin></b:skin>
</head>
<body>
</body>
</html>
5. Blogger template require at least one b:section tag
 |
| Blogger Template require at least one b:section tag |
Blogger element like header, footer, post area and side bar will be separated using b:section tag inside the <body> tag.
That's why we
need at least on b:section tag.Add the yellow code below:
<html>
<head>
<b:skin></b:skin>
</head>
<body>
<b:section></b:section>
</body>
</html>
<head>
<b:skin></b:skin>
</head>
<body>
<b:section></b:section>
</body>
</html>
6. b:section tag should have unique ID
 |
| Blogger Template Need Unique ID |
Put the id for section that has been created.
Add the yellow code below:
<html>
<head>
<b:skin></b:skin>
</head>
<body>
<b:section id="header"></b:section>
</body>
</html>
<head>
<b:skin></b:skin>
</head>
<body>
<b:section id="header"></b:section>
</body>
</html>
7. It is work. Now we have blogger template than can be saved
 |
| a complete blogger template that can be save |
8. Preview the blogger template
Now we understand the minimum code for blogger template. Lets examine the appearance of this template.
I have one example of this template on the link below:
We
can see that there is nothing there. It is only blank white background.
So with the template that we have just created, we only produce a blank
screen.
 |
| Empty Blogger Template Preview |
 |
| Layout Blogger With Minimum Code |
9. Check the code again.
 |
| Blogger add the XML declaration and XML element in HTML code |
After we save the template, blogger will add the document declaration and HTML element. Below is the complete code for blogger template that can be saved.
<?xml version="1.0" encoding="UTF-8" ?>
<html xmlns='http://www.w3.org/1999/xhtml' xmlns:b='http://www.google.com/2005/gml/b' xmlns:data='http://www.google.com/2005/gml/data' xmlns:expr='http://www.google.com/2005/gml/expr'>
<head>
<b:skin></b:skin>
</head>
<body>
<b:section id="header"></b:section>
</body>
</html>

Thanks a lot. Now i can set up my blog more easily
ReplyDeleteHi Goerges.. Thanks for visit. You can share your experince here to help others.
Delete